
Microsoft Flight Simulator 2024 can be an intimidating experience when you first sit in the cockpit. Unlike a traditional flying game, Microsoft Flight Simulator 2024 (MSFS 2024) attempts to recreate the experience of actually operating an aircraft, from starting the engine and taxiing to navigating, communicating with air traffic control and managing the aircraft throughout the flight.
The good news is that you do not need to understand aviation before you start. MSFS 2024 includes dedicated training lessons, accessibility options, flight assistance and a huge range of aircraft that allow you to gradually build your skills. Microsoft itself recommends that completely new players begin with Discovery Flights before progressing to Flight Training, where you can learn essential skills such as taxiing, take-off, navigation and landing in a Cessna 152.
Whether you have just purchased Microsoft Flight Simulator 2024 or you have been flying for a while but still struggle with some of the fundamentals, this beginner's guide will take you through the essential stages of learning to fly.
Getting Started with Microsoft Flight Simulator 2024
Before attempting to fly a complex airliner, it is worth spending some time learning the fundamentals in a small aircraft.
The Cessna 152 is an excellent starting point because it is relatively simple to operate and gives you a good introduction to the basic principles of flight. It also features prominently in the simulator's built-in Flight Training lessons.
If you are completely new to aviation, start by selecting Flight Training from the main menu. The training programme introduces you to the fundamental concepts you need to understand, including taxiing, take-off, manoeuvring, navigation and landing.
You can also try Discovery Flights if you simply want to experience the world before learning the technical side of flying. These flights begin with you already in the air, allowing you to concentrate on controlling the aircraft and enjoying the scenery rather than worrying about starting the engine or planning a route.
Once you are comfortable controlling a small aircraft, you can gradually move towards more advanced aircraft and realistic procedures.
Start with Assistance Enabled
There is absolutely nothing wrong with using the simulator's assistance features when you are learning.
In fact, trying to fly completely unaided from your first flight can make MSFS 2024 unnecessarily frustrating. The simulator provides various assistance options that can help new players with areas such as take-off, landing and aircraft control.
Think of these features as training wheels rather than something you need to use forever. As you become more confident, gradually reduce the assistance until you are managing the aircraft yourself.
MSFS 2024 also allows you to customise controls and assistance settings, meaning you can create a setup that grows with your experience.

Understanding the Cockpit
The cockpit is probably the most intimidating part of Microsoft Flight Simulator when you first start playing.
There can be dozens of switches, buttons, screens and instruments in front of you, but you do not need to understand everything immediately.
Instead, concentrate on learning the handful of instruments that tell you how the aircraft is flying.
Airspeed Indicator
The airspeed indicator tells you how fast the aircraft is travelling through the air, normally displayed in knots.
Airspeed is one of the most important pieces of information in the cockpit because aircraft have different operating speeds. Flying too slowly can result in a stall, while flying too quickly can exceed the aircraft's limitations.
During take-off, climb, cruise and landing, you will constantly monitor your airspeed.
Attitude Indicator
The attitude indicator, sometimes called the artificial horizon, shows the aircraft's pitch and bank.
The horizontal line represents the horizon. If the aircraft's nose is above the horizon, you are pitching up. If it is below the horizon, you are pitching down.
The indicator also shows whether the aircraft is banking left or right.
For beginners, this is one of the most useful instruments to watch because it tells you what the aircraft is physically doing even when you cannot easily judge it from the outside.

Altimeter
The altimeter tells you your altitude above mean sea level, normally in feet. If you are flying at 3,000 feet, for example, the altimeter will indicate approximately 3,000 feet.
Altitude becomes particularly important when navigating, following air traffic control instructions and setting up an approach for landing.

Vertical Speed Indicator
The vertical speed indicator, or VSI, tells you whether you are climbing or descending and approximately how quickly.
It is usually measured in feet per minute.
For example, a reading of +500 means you are climbing at approximately 500 feet per minute, while -500 means you are descending at approximately 500 feet per minute.

Heading Indicator
The heading indicator tells you which direction the aircraft is pointing, making it one of the most important instruments for navigation. It works much like a compass, allowing you to see your current direction and make accurate turns towards a specific heading.
Headings are normally displayed as degrees around a compass, with north represented by 360° or 000°, east by 090°, south by 180° and west by 270°. For example, if your heading indicator reads 090°, you are flying east, while a heading of 270° means you are flying west.
Learning to understand headings is essential for navigation, particularly when following a flight plan or instructions from air traffic control. As you become more comfortable with MSFS 2024, you will use headings regularly to maintain your course, make turns and position the aircraft correctly for approaches and landings.

Engine Instruments
Depending on the aircraft, you may have instruments showing engine RPM, oil pressure, oil temperature, fuel quantity, manifold pressure and other information.
Do not try to memorise everything at once.
Start with the instruments relevant to the current stage of flight and gradually learn the rest as you move into more advanced aircraft.

Basic Flight Controls Explained
The fundamental controls of an aircraft are surprisingly straightforward.
The difficulty comes from learning how they interact.
The three primary flight controls are pitch, roll and yaw.
Pitch
Pitch controls whether the aircraft's nose moves up or down.
Pulling back on a yoke or joystick generally raises the nose, while pushing forwards lowers it.
Pitch has a major effect on airspeed and altitude. Raising the nose generally reduces speed unless you increase engine power, while lowering the nose generally increases speed.
This relationship is one of the most important concepts to understand when learning to fly.
Roll
Roll controls the aircraft's bank angle.
Moving the yoke or joystick left causes the aircraft to bank left, while moving it right causes the aircraft to bank right.
When turning, you normally combine bank with appropriate pitch and power adjustments rather than simply holding the aircraft's nose in a new direction.

Yaw
Yaw moves the aircraft's nose from side to side around its vertical axis.
The rudder controls yaw and is particularly important during take-off and landing.
If you are using a joystick, the rudder may be controlled by twisting the stick. If you are using pedals, the pedals provide dedicated rudder control.
Throttle
The throttle controls engine power or thrust.
In a piston aircraft such as the Cessna 152, increasing throttle generally increases engine power and therefore allows you to accelerate or climb. Reducing throttle decreases power and allows you to slow down or descend.
Modern aircraft can have considerably more complicated power-management systems, which is why learning on a simple aircraft first is so useful.

How to Take Off in Microsoft Flight Simulator 2024
Once you understand the basic controls, take-off is one of the first skills you should practise repeatedly.
For a beginner, use a small single-engine aircraft and choose a straightforward airport with a long runway.
Step 1: Complete Your Pre-Flight Checks
Before moving, make sure the aircraft is ready to fly.
Check that the engine is running correctly, you have sufficient fuel and the aircraft's major controls are functioning.
If you are using the simulator's assistance features, some of these processes may be simplified.
When you eventually move towards more realistic flying, you should begin following the aircraft's checklist rather than simply relying on automatic systems.
Step 2: Taxi to the Runway
Release the parking brake and use gentle throttle to begin moving.
Taxi slowly. You do not need to rush towards the runway.
Use the rudder or nose-wheel steering to keep the aircraft travelling along the taxiway centreline.
As you approach the runway, follow the airport signage and make sure you are entering the correct runway.
Step 3: Line Up with the Runway
Stop or slow down before entering the runway if necessary.
Line the aircraft up with the runway centreline and make sure the aircraft is pointing straight ahead.
This is a good moment to check your instruments and confirm that your take-off configuration is correct.
Step 4: Apply Take-Off Power
Increase the throttle smoothly towards the appropriate take-off power.
As the aircraft accelerates, use small rudder inputs to keep it aligned with the runway.
Do not make large control movements. At higher speeds, even small control inputs can have a significant effect.
Step 5: Rotate
As the aircraft approaches its recommended rotation speed, gently pull back on the controls to raise the nose.
The exact speed varies considerably between aircraft, so do not use one universal number for every aeroplane.
The aircraft should naturally become airborne once sufficient lift has been generated.
Step 6: Establish Your Climb
Once airborne, maintain a controlled pitch attitude and keep the aircraft travelling in the desired direction.
Do not immediately make dramatic turns.
Allow the aircraft to climb, maintain a safe airspeed and gradually clean up the aircraft by retracting flaps and landing gear where appropriate.
Your first objective is simply to establish a stable climb.
How to Fly Straight and Level
One of the best exercises for a beginner is surprisingly simple: fly in a straight line.
Choose an altitude and heading and try to maintain them without using autopilot.
Start by selecting a comfortable cruising speed and altitude.
Look at the attitude indicator, altimeter, heading indicator and airspeed indicator. Make tiny corrections rather than constantly moving the controls.
If your aircraft starts climbing, make a small pitch correction.
If it starts descending, make a small correction in the opposite direction.
If the heading begins drifting, gently correct the bank.
The goal is not to hold the controls perfectly still. Real aircraft require constant small corrections because the atmosphere is never completely static.
How to Turn
Turning an aircraft is more than simply moving the joystick left or right.
Start with a gentle bank.
As the aircraft rolls into the turn, watch the attitude indicator and heading indicator. Maintain a sensible pitch attitude while the aircraft turns.
When you approach your desired heading, gradually reduce the bank and return to straight-and-level flight.
For example, if you are heading 090° and want to turn towards 180°, begin a gentle right turn and monitor the heading indicator.
Do not wait until the instrument reaches 180° before stopping the turn. Anticipate the heading and gradually roll the aircraft level.
This is one of those skills that becomes considerably easier with practice.
How to Land in Microsoft Flight Simulator 2024
Landing is often the most difficult part of learning to fly.
It is completely normal for your first few approaches to be too high, too fast, too low or too far from the runway.
The secret is to start preparing for the landing well before you reach the airport.
Step 1: Plan Your Approach
Before descending towards the airport, identify the runway you intend to use.
Look at the runway direction, your current position, your altitude and your speed.
If you are using the EFB in MSFS 2024, you can use the simulator's built-in flight-planning functionality to help prepare your route. The EFB provides tools for flight planning, weight and balance and airport charts.
Step 2: Reduce Your Speed
Begin slowing down before you reach the runway.
Do not leave everything until the last few seconds.
Reduce throttle gradually and configure the aircraft for landing according to its checklist.
This may include extending the flaps and, on aircraft with retractable landing gear, lowering the gear.
Step 3: Establish the Final Approach
The final approach is the last straight section of flight before touchdown.
Your aim is to fly towards the runway at the aircraft's recommended approach speed while maintaining the appropriate descent path.
Keep the runway aligned with the aircraft's centreline.
If the runway appears to move left in your windscreen, correct your heading gently. If it moves right, make the opposite correction.

Step 4: Control Your Descent
Use pitch and throttle together.
If you are too high, you may need to increase your descent rate and/or reduce power.
If you are too low, add power and adjust your pitch to regain the correct approach path.
Avoid making large corrections close to the ground.
Step 5: Flare
As you approach the runway, gently raise the nose.
This is called the flare.
The objective is to reduce the aircraft's rate of descent and allow the main landing gear to touch down smoothly.
Do not pull back aggressively. A large pitch-up movement can cause the aircraft to climb again or lose airspeed.
Step 6: Touch Down and Brake
After touchdown, keep the aircraft aligned with the runway.
Reduce the throttle and use the appropriate braking system.
Continue using rudder or nose-wheel steering to remain on the centreline.
Once you have slowed sufficiently, exit the runway and begin taxiing to your destination.
Remember that a good landing is not necessarily one where you touch down perfectly every time. Consistent, controlled approaches are much more important when you are learning.
Understanding Navigation in MSFS 2024
Once you can take off and land, navigation becomes the next major skill.
At its simplest, navigation means answering three questions:
Where am I?
Where am I going?
What heading and altitude do I need to get there?
Microsoft Flight Simulator 2024 includes an Electronic Flight Bag (EFB), which provides tools for planning flights and working with airport charts. You can use this to build a route before or during your flight.
VFR Navigation
VFR means Visual Flight Rules.
This is generally the easiest form of navigation for beginners.
Instead of relying entirely on instruments, you navigate using visible landmarks such as towns, rivers, coastlines, roads, mountains and airports.
For example, you could plan a flight around Manchester and use major roads, the coastline or recognisable landmarks to help maintain your position.
VFR flying is an excellent way to learn how an aircraft moves through the world without immediately becoming overwhelmed by complex avionics.
IFR Navigation
IFR means Instrument Flight Rules.
This involves relying much more heavily on instruments, navigation systems and procedures.
As you progress towards airliners and professional-style flying, IFR becomes increasingly important.
You will encounter concepts such as waypoints, airways, departure procedures, arrival procedures and instrument approaches.
Do not worry if these terms sound complicated. Learn them one at a time.
Understanding Waypoints and Flight Plans
A flight plan is essentially a set of instructions describing where you intend to fly.
Instead of simply choosing a destination and pointing the aircraft towards it, an IFR flight might contain multiple waypoints along the route.
Your aircraft's navigation system can then follow those points.
For example:
Airport → Waypoint A → Waypoint B → Waypoint C → Destination Airport
This becomes particularly useful on long flights.
Rather than manually steering the aircraft for several hours, you can programme the aircraft's navigation system and use autopilot to follow the route.
Using Autopilot in Microsoft Flight Simulator 2024
Autopilot is one of the most useful systems to learn once you understand basic manual flying.
It is also one of the easiest systems for beginners to misunderstand.
Autopilot does not mean that the aircraft flies everything automatically.
Instead, it follows the instructions you give it.
Depending on the aircraft, autopilot can control things such as heading, altitude, vertical speed, airspeed and navigation.
The exact implementation varies considerably between aircraft.
Start with Heading Hold
A good first exercise is to use heading hold.
Fly manually until you are established at a comfortable altitude and heading.
Activate the autopilot and select the appropriate heading mode.
The aircraft should then maintain the selected heading.
This gives you an opportunity to look around the cockpit and learn how the autopilot controls work without having to simultaneously control the aircraft manually.
Use Altitude Hold
Once you understand heading mode, try altitude hold.
Climb manually to a selected altitude and then engage the appropriate altitude mode.
The aircraft should maintain that altitude.
You can then experiment with changing your target altitude using the autopilot controls.

Understanding Vertical Speed
Vertical Speed, usually abbreviated to VS, allows you to tell the autopilot how quickly you want to climb or descend.
For example, you might select a climb of +500 feet per minute.
The aircraft will then attempt to maintain that vertical speed.
Be careful, however, because excessive vertical speed at low airspeed can cause the aircraft to slow dramatically.
This is why understanding basic aircraft control should come before relying heavily on automation.
Navigation Mode
More advanced aircraft can use navigation modes to follow a programmed flight plan.
Once the route has been entered into the aircraft's avionics, the autopilot can often follow the route automatically.
This is where flight simulation starts to become particularly interesting because you are no longer simply flying from one airport to another. You are managing a complete flight.
MSFS 2024 supports aircraft with different levels of autopilot functionality, and the exact systems available depend on the aircraft being flown.
A Simple First Flight to Practise
If you want a straightforward training exercise, try this:
Start with a Cessna 152 at a familiar airport.
Begin with a runway departure and climb to a comfortable altitude.
Fly straight and level for a few minutes.
Practise gentle left and right turns.
Then try climbing and descending while maintaining your airspeed.
Return towards the airport and practise setting up a basic landing approach.
Finally, land, taxi clear of the runway and return to the parking area.
Repeat the same flight several times.
You will probably find that your fifth flight is dramatically better than your first.
Once this becomes comfortable, introduce navigation, then autopilot, then more complex aircraft.

Recommended Microsoft Flight Simulator 2024 Accessories
You can absolutely enjoy MSFS 2024 using a keyboard and controller, but dedicated flight hardware can make a huge difference.
Microsoft's own hardware guide explains that PC players can use equipment ranging from basic controllers and joysticks through to HOTAS systems, yokes, throttle quadrants, rudder pedals, head tracking and VR.
You do not need to buy everything at once.
Start with a Joystick or Yoke
A joystick is an excellent starting point because it gives you analogue control over the aircraft.
A yoke is particularly appropriate for aircraft that use yoke controls in real life, such as many general aviation aircraft.
Microsoft notes that a joystick offers greater flexibility across different aircraft types, while a yoke provides a more authentic experience for aircraft designed around that control system.
Add a Throttle
A dedicated throttle can make power management significantly easier.
Instead of using keyboard commands to increase and decrease engine power, you can physically move a throttle lever.
This is especially useful when practising take-offs, approaches and landings.

Rudder Pedals
Rudder pedals provide dedicated control of the aircraft's yaw.
They are not essential for a beginner, but they can make taxiing, take-offs, landings and coordinated turns much easier.
HOTAS
HOTAS stands for Hands On Throttle And Stick.
A HOTAS setup combines a joystick with a dedicated throttle and programmable controls.
It is particularly popular with military aircraft and players who want a large number of controls immediately accessible without taking their hands away from the primary flight controls.
Learn Your Controls Instead of Memorising Everything
One of the biggest mistakes new MSFS players make is trying to learn every control immediately.
You don't need to.
Start by learning the controls you use constantly:
Pitch: raise or lower the nose.
Roll: bank left or right.
Yaw: control the aircraft's nose direction.
Throttle: increase or decrease engine power.
Flaps: change the aircraft's aerodynamic configuration for different stages of flight.
Landing gear: raise or lower the undercarriage where applicable.
Brakes: slow the aircraft on the ground.
Autopilot: automate selected aspects of flight.
Once these become second nature, add more advanced commands.
The simulator's Controls menu allows you to review detected input devices and customise individual controls, so you can gradually build a control scheme that suits your flying style.
How Shortcut Keyboards Can Improve Your Overall Workflow
If you are a Microsoft Flight Simulator player who also spends time editing videos, producing music or creating content, there is another part of your setup worth considering: your keyboard.
MSFS 2024 contains a huge number of controls, but if you are also recording your flights for YouTube, editing aviation videos or creating content about your simulator, constantly referring to keyboard shortcuts in your editing software can interrupt your workflow.
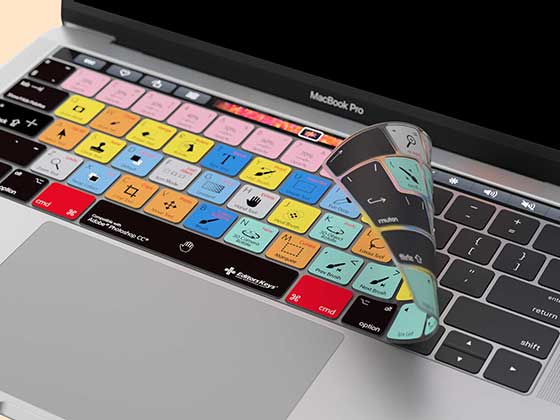
This is where Editors Keys shortcut keyboards and keyboard covers can be particularly useful.
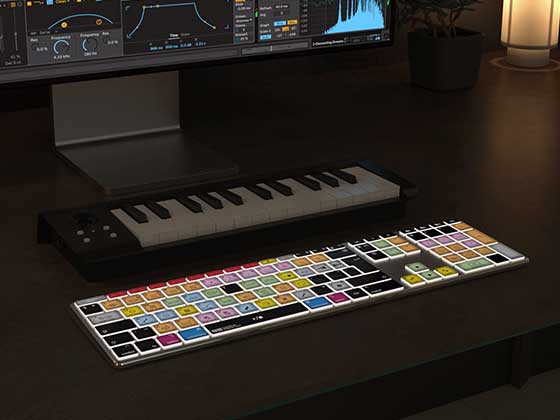
Editors Keys keyboards are designed with software shortcuts printed directly onto the keys, allowing you to see important commands without constantly searching through menus or trying to remember key combinations.
The range covers popular creative applications including video editing, audio production, colour grading and other professional software.
AB10 Core Wired USB-C Backlit Shortcut Keyboard
The Editors Keys AB10 Core Wired USB-C Backlit Keyboard is designed for creators who want a reliable, professional keyboard for their editing and production workflow. Using a direct USB-C wired connection, it provides a simple plug-and-play setup without the need to charge or manage a wireless battery.
The keyboard features backlit keys with your favourite software shortcuts clearly printed directly onto them, making it much easier to find and memorise frequently used commands. Rather than constantly searching through menus or keeping a shortcut cheat sheet nearby, you can simply glance down at the keyboard and see the command you need.
For Microsoft Flight Simulator 2024 players who also create YouTube videos, cinematic flight footage or aviation content, the AB10 Core can be a particularly useful addition to your editing setup. Once you've finished a flight, you can move straight into your preferred editing software and have your most important shortcuts clearly displayed beneath your fingers.
The wired USB-C design also makes the AB10 Core an excellent choice for a permanent desktop editing workstation. Simply connect it to your computer and start working, with no wireless pairing or battery charging required. Combined with the illuminated shortcut keys, it gives you a fast, practical way to improve your editing workflow while making professional keyboard shortcuts easier to learn through everyday use.

From Beginner to Professional-Style Sim Pilot
Becoming good at Microsoft Flight Simulator 2024 is not about learning everything in a single weekend.
The best approach is to build your skills progressively.
- Start by learning how the aircraft moves.
- Then learn to take off.
- Practise straight-and-level flight.
- Learn gentle turns.
- Practise climbs and descents.
- Learn to navigate.
- Practise landing.
Once these skills become comfortable, start learning autopilot and more sophisticated navigation systems.
From there, you can begin exploring larger aircraft, IFR procedures, instrument approaches, air traffic control and realistic airline operations.
Eventually, you may find yourself planning complete flights with departure procedures, cruise altitudes, arrivals and approaches, managing fuel and weight, programming avionics and operating the aircraft using procedures that closely resemble real-world aviation.
Microsoft Flight Simulator 2024 is particularly well suited to this gradual progression because it combines accessible introductory content with much deeper systems and aircraft simulation. Microsoft's own New Flight Simmer Guide highlights everything from aviation fundamentals and cockpit familiarisation to navigation, procedural training and career exploration.
Most importantly, don't worry about making mistakes, that's all part of learning!
The key is to understand why something went wrong, repeat the flight and try again. The more you fly, the less you will need to think about the basic controls, allowing you to concentrate on the more interesting aspects of aviation.
Whether you are happy flying a Cessna around your local area or eventually want to simulate long-haul airline operations, Microsoft Flight Simulator 2024 gives you an enormous amount to learn and explore.
And if your virtual pilot career also involves creating YouTube videos, editing cinematic flight footage or producing aviation content, a dedicated Editors Keys shortcut keyboard or silicone shortcut cover can help make the other half of your workflow faster, more efficient and easier to learn.
Frequently Asked Questions
Is Microsoft Flight Simulator 2024 difficult for beginners?
It can initially feel complicated because the simulator contains a huge amount of aviation information, but you do not need to learn everything at once. The built-in Flight Training lessons are designed to introduce beginners to fundamental skills progressively.
What is the best aircraft for beginners in MSFS 2024?
A small general aviation aircraft such as the Cessna 152 is an excellent place to start. It is relatively straightforward and allows you to learn the fundamentals of flying without being overwhelmed by complex airliner systems.
Can you play MSFS 2024 with a keyboard?
Yes, but analogue controls such as a joystick, yoke or compatible controller generally provide a better flying experience. Microsoft recommends analogue input devices for in-flight control, while keyboard and mouse remain useful for menu navigation and other functions.
Do I need a joystick for Microsoft Flight Simulator 2024?
No. You can begin with a compatible controller, but a joystick or yoke can provide much more precise analogue control. Dedicated flight peripherals can be added later as your interest in simulation grows.
What should I learn first in Microsoft Flight Simulator 2024?
Start with the built-in Flight Training programme. Learn basic aircraft control, taxiing, take-off, straight-and-level flight, turns, navigation and landing before moving onto advanced aircraft and systems.
Is MSFS 2024 realistic enough to learn real aviation?
Microsoft Flight Simulator can be extremely useful for familiarisation, procedural practice and learning aviation concepts, but it should not be treated as a replacement for professional flight training. Microsoft itself describes the simulator as having educational and aviation applications while noting that it is not approved as a substitute for formal flight training.

Final Thoughts
Microsoft Flight Simulator 2024 can seem overwhelming when you first open the cockpit, but learning to fly does not have to be complicated, just take it one skill at a time!
Learn the basic controls, understand the most important instruments, practise taking off and landing, then gradually introduce navigation and autopilot.
Once those fundamentals become second nature, you can start exploring everything else MSFS 2024 has to offer, from realistic airline operations and IFR flying to challenging approaches, detailed aircraft systems and worldwide exploration.
And if you are also a video editor, musician or content creator, don't overlook the importance of an efficient desk setup. Editors Keys shortcut keyboards and silicone keyboard covers put your favourite software's commands directly in front of you, helping you spend less time memorising shortcuts and more time creating.
Explore the Editors Keys range of AB10 Core Wired USB-C shortcut keyboards to build a faster, more efficient creative workflow alongside your flight simulator setup.